I have a dual boot on my desktop pc: Windows 11 and Ubuntu Linux. I hardly every use the Windows installation. Maybe for some games, but Steam has gotten better and better at supporting games on Linux. Or when you need to login on some government website with your eID and you can’t use the ItsMe app.
Many moons ago I did a boo-boo: for some reason I felt that I had to make my EFI system partition bigger. Which also meant resizing and moving all other partitions. Linux didn’t flinch but Windows pooped in its pants. Apparently that operating system is soooo legacy that it can’t cope with a simple partition move. I tried to fix it using a Windows system repair disk but the damn thing just couldn’t be arsed.
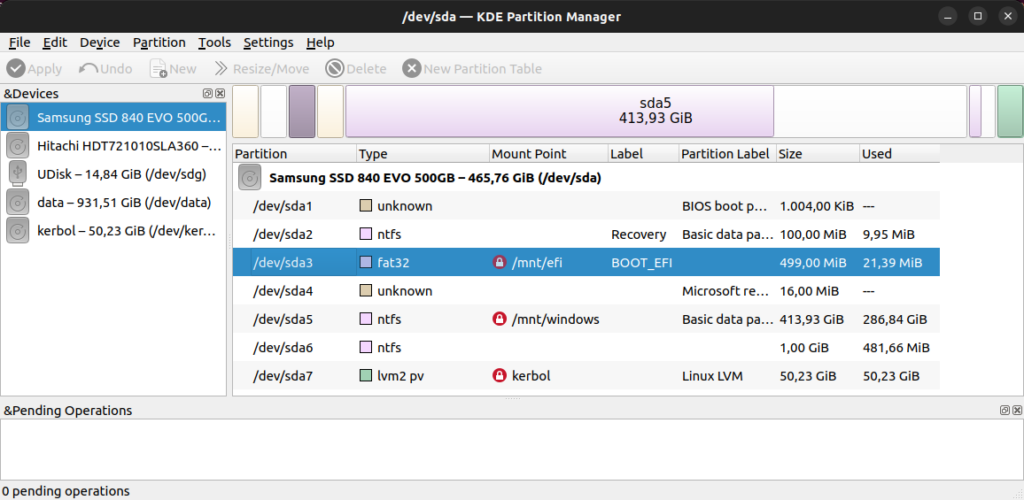
The partitions on my first hard disk
For a long time I just couldn’t be bothered with any further repair attempts. I don’t need that Windows anyway. I can always run Windows in VirtualBox if I really need it. It also means that I can nuke a 414 GiB partition and use that space for better things. As you can see in the screenshot, I mounted it on /mnt/windows with the intention of copying the directory Users/Amedee to Linux, in case there was still something of value there. Probably not, but better safe than sorry.
There’s just one small snag: for the life of me, I couldn’t find a Windows activation key, or remember where I put it. It’s not an OEM PC so the key isn’t stored in the BIOS. And I didn’t want to waste money on buying another license for an operating system that I hardly ever use.
I googled for methods to retrieve the Windows activation key. Some methods involve typing a command on the command prompt of a functioning Windows operating system, so those were not useful for me. Another method is just reading the activation key from the Windows Registry:
I don’t need a working Windows operating system to read Registry keys, I can just mount the Windows filesystem in Linux and query the Registry database files in /Windows/System32/config/. I found 2 tools for that purpose: hivexget and reglookup.
hivexget
This one is the simplest, it directly outputs the value of a registry key.
Me: uses Pandoc and LaTeX to convert the file to PDF and read it in Evince because I don’t have LibreOffice installed and I’m too lazy to upload the document to Google Docs.
I needed to review an addendum to a rental contract. (I moved! I’ll write about that later.) The addendum was sent to me in ODT format. At the time, my desktop pc was still packed in a box. On my laptop (a 2011 MacBook Air with Ubuntu 20.04) I only have the most essential software installed, which for me doesn’t include an office suite. I could install LibreOffice, but why make it easy if I can also do it the hard way? 😀
I do have Evince installed, which is a lightweight PDF viewer. To convert ODT to PDF I’m using Pandoc, which is a Swiss army knife for converting document formats. For PDF it needs the help of LaTeX, a document preparation system for typesetting.
First I installed the required software:
$ sudo apt install pandoc texlive texlive-latex-extra
Reading package lists... Done
Building dependency tree
Reading state information... Done
The following additional packages will be installed:
  libapache-pom-java libcommons-logging-java libcommons-parent-java libfontbox-java libpdfbox-java preview-latex-style texlive-base texlive-binaries
  texlive-fonts-recommended texlive-latex-base texlive-latex-recommended texlive-pictures texlive-plain-generic tipa
Suggested packages:
  libavalon-framework-java libcommons-logging-java-doc libexcalibur-logkit-java liblog4j1.2-java texlive-xetex texlive-luatex pandoc-citeproc
  context wkhtmltopdf librsvg2-bin groff ghc php python r-base-core libjs-mathjax node-katex perl-tk xzdec texlive-fonts-recommended-doc
  texlive-latex-base-doc python3-pygments icc-profiles libfile-which-perl libspreadsheet-parseexcel-perl texlive-latex-extra-doc
  texlive-latex-recommended-doc texlive-pstricks dot2tex prerex ruby-tcltk | libtcltk-ruby texlive-pictures-doc vprerex
The following NEW packages will be installed:
  libapache-pom-java libcommons-logging-java libcommons-parent-java libfontbox-java libpdfbox-java pandoc preview-latex-style texlive texlive-base
  texlive-binaries texlive-fonts-recommended texlive-latex-base texlive-latex-extra texlive-latex-recommended texlive-pictures texlive-plain-generic
  tipa
0 upgraded, 17 newly installed, 0 to remove and 1 not upgraded.
Need to get 116 MB of archives.
After this operation, 448 MB of additional disk space will be used.
Do you want to continue? [Y/n]
Just to compare, installing LibreOffice Writer would actually use less disk space. Pandoc is a lot faster though.
$ sudo apt install libreoffice-writer
Reading package lists... Done
Building dependency tree
Reading state information... Done
The following additional packages will be installed:
  libabw-0.1-1 libboost-date-time1.71.0 libboost-filesystem1.71.0 libboost-iostreams1.71.0 libboost-locale1.71.0 libclucene-contribs1v5
  libclucene-core1v5 libcmis-0.5-5v5 libe-book-0.1-1 libeot0 libepubgen-0.1-1 libetonyek-0.1-1 libexttextcat-2.0-0 libexttextcat-data libgpgmepp6
  libjuh-java libjurt-java liblangtag-common liblangtag1 libmhash2 libmwaw-0.3-3 libmythes-1.2-0 libneon27-gnutls libodfgen-0.1-1 liborcus-0.15-0
  libraptor2-0 librasqal3 librdf0 libreoffice-base-core libreoffice-common libreoffice-core libreoffice-math libreoffice-style-colibre
  libreoffice-style-tango librevenge-0.0-0 libridl-java libuno-cppu3 libuno-cppuhelpergcc3-3 libuno-purpenvhelpergcc3-3 libuno-sal3
  libuno-salhelpergcc3-3 libunoloader-java libwpd-0.10-10 libwpg-0.3-3 libwps-0.4-4 libxmlsec1 libxmlsec1-nss libyajl2 python3-uno uno-libs-private
  ure
Suggested packages:
  raptor2-utils rasqal-utils librdf-storage-postgresql librdf-storage-mysql librdf-storage-sqlite librdf-storage-virtuoso redland-utils
  libreoffice-base gstreamer1.0-plugins-bad tango-icon-theme fonts-crosextra-caladea fonts-crosextra-carlito libreoffice-java-common
The following NEW packages will be installed:
  libabw-0.1-1 libboost-date-time1.71.0 libboost-filesystem1.71.0 libboost-iostreams1.71.0 libboost-locale1.71.0 libclucene-contribs1v5
  libclucene-core1v5 libcmis-0.5-5v5 libe-book-0.1-1 libeot0 libepubgen-0.1-1 libetonyek-0.1-1 libexttextcat-2.0-0 libexttextcat-data libgpgmepp6
  libjuh-java libjurt-java liblangtag-common liblangtag1 libmhash2 libmwaw-0.3-3 libmythes-1.2-0 libneon27-gnutls libodfgen-0.1-1 liborcus-0.15-0
  libraptor2-0 librasqal3 librdf0 libreoffice-base-core libreoffice-common libreoffice-core libreoffice-math libreoffice-style-colibre
  libreoffice-style-tango libreoffice-writer librevenge-0.0-0 libridl-java libuno-cppu3 libuno-cppuhelpergcc3-3 libuno-purpenvhelpergcc3-3
  libuno-sal3 libuno-salhelpergcc3-3 libunoloader-java libwpd-0.10-10 libwpg-0.3-3 libwps-0.4-4 libxmlsec1 libxmlsec1-nss libyajl2 python3-uno
  uno-libs-private ure
0 upgraded, 52 newly installed, 0 to remove and 1 not upgraded.
Need to get 78,5 MB of archives.
After this operation, 283 MB of additional disk space will be used.
Do you want to continue? [Y/n] n
Abort.
Next, converting the file. It’s possible to tell Pandoc which file formats to use with the -f (from) and -t (to) switches, but it can usually guess correctly based on the file extensions.
$ time pandoc 2022-06-house-contract-adendum.odt -o 2022-06-house-contract-adendum.pdf

real	0m0,519s
user	0m0,475s
sys	0m0,059s
It took only half a second to convert the file. Opening LibreOffice takes a bit more time on this old laptop.
You can see the PDF document properties with pdfinfo:
$ pdfinfo 2022-06-house-contract-adendum.pdf
Title:
Subject:
Keywords:
Author:
Creator:        LaTeX with hyperref
Producer:       pdfTeX-1.40.20
CreationDate:   Sat Jun 11 23:32:30 2022 CEST
ModDate:        Sat Jun 11 23:32:30 2022 CEST
Tagged:         no
UserProperties: no
Suspects:       no
Form:           none
JavaScript:     no
Pages:          2
Encrypted:      no
Page size:      612 x 792 pts (letter)
Page rot:       0
File size:      64904 bytes
Optimized:      no
PDF version:    1.5
I don’t want it in letter format, I want A4:
$ time pandoc -V papersize:a4 -o 2022-06-house-contract-adendum.pdf 2022-06-house-contract-adendum.odt

real	0m0,520s
user	0m0,469s
sys	0m0,060s
$ pdfinfo 2022-06-house-contract-adendum.pdf
Title:
Subject:
Keywords:
Author:
Creator:        LaTeX with hyperref
Producer:       pdfTeX-1.40.20
CreationDate:   Sat Jun 11 23:40:16 2022 CEST
ModDate:        Sat Jun 11 23:40:16 2022 CEST
Tagged:         no
UserProperties: no
Suspects:       no
Form:           none
JavaScript:     no
Pages:          2
Encrypted:      no
Page size:      595.276 x 841.89 pts (A4)
Page rot:       0
File size:      64935 bytes
Optimized:      no
PDF version:    1.5
Then I could open the file with evince 2022-06-house-contract-adendum.pdf.
I use CrashPlan for cloud backups. In 2018 they stopped their Home solution, so I switched to their Business plan.
It works very well on Linux, Windows and Mac, but it was always a bit fickle on my QNAP NAS. There is a qpkg package for CrashPlan, and there are lots of posts on the QNAP support forum. After 2018, none of the solutions to run a backup on the NAS itself stopped working. So I gave up, and I didn’t have a backup for almost 4 years.
Now that I have mounted most of the network shares on my local filesystem, I can just run the backup on my pc. I made 3 different backup sets, one for each of the shares. There’s only one thing that I had to fix: if Crashplan runs when the shares aren’t mounted, then it thinks that the directories are empty, and it will delete the backup on the cloud storage. As soon as the shares come back online, the files are backed up again. It doesn’t have to upload all files again, because Crashplan doesn’t purge the files on it’s cloud immediately, but the file verification still happens. That takes time and bandwidth.
I contacted CrashPlan support about this issue, and this was their reply:
I do not believe that this scenario can be avoided with this product – at least not in conjunction with your desired setup. If a location within CrashPlan’s file selection is detached from the host machine, then the program will need to rescan the selection. This is in inherent drawback to including network drives within your file selection. Your drives need to retain a stable connection in order to avoid the necessity of the software to run a new scan when it sees the drives attached to the device (so long as they’re within the file selection) detach and reattach.
Since the drive detaching will send a hardware event from the OS to CrashPlan, CrashPlan will see that that hardware event lies within its file selection – due to the fact that you mapped your network drives into a location which you’ve configured CrashPlan to watch. A hardware event pointing out that a drive within the /home/amedee/Multimedia/ file path has changed its connection status will trigger a scan. CrashPlan will not shut down upon receiving a drive detachment or attachment hardware event. The program needs to know what (if anything) is still there, and is designed firmly to track those types of changes, not to give up and stop monitoring the locations within its file selection.
There’s no way around this, aside from ensuring that you either keep a stable connection. This is an unavoidable negative consequence of mapping a network drive to a location which you’ve included in CrashPlan’s file selection. The only solution would be for you to engineer your network so as not to interrupt the connection.
Nathaniel, Technical Support Agent, Code42
I thought as much already. No problem, Nathaniel! I found a workaround: a shell script that checks if a certain marker file on the network share exists, and if it doesn’t, then the script stops the CrashPlan service, which will prevent CrashPlan from scanning the file selection. As soon as the file becomes available again, then the CrashPlan service is started. This workaround works, and is good enough for me. It may not be the cleanest solution but I’m happy with it.
I first considered using inotifywait, which listens to filesystem events like modifying or deleting files, or unmount. However when the network connection just drops for any reason, then inotifywait doesn’t get an event. So I have to resort to checking if a file exists.
#!/bin/bash
file_list="/home/amedee/bin/file_list.txt"

all_files_exist () {
    while read -r line; do
        [ -f "$line" ]
        status=$?
        if ! (exit $status); then
            echo "$line not found!"
            return $status
        fi
    done < "$file_list"
}

start_crashplan () {
    /etc/init.d/code42 start
}

stop_crashplan () {
    /etc/init.d/code42 stop
}

while true; do
    if all_files_exist; then
        start_crashplan
    else
        stop_crashplan
    fi
    sleep 60
done
file_list.txt contains a list of testfiles on different shares that I want to check. They all have to be present, if even only one of them is missing or can’t be reached, then the service must be stopped.
I can add or remove shares without needing to modify the script, I only need to edit file_list.txt – even while the script is still running.
Starting (or stopping) the service if it is already started (or stopped) is very much ok. The actual startup script itself takes care of checking if it has already started (or stopped).
This script needs to be run at startup as root, so I call it from cron (sudo crontab -u root -e):
@reboot /home/amedee/bin/test_cifs_shares.sh
This is what CrashPlan support replied when I told them about my workaround:
Hello Amedee,
That is excellent to hear that you have devised a solution which fits your needs!
This might not come in time to help smooth out your experience with your particular setup, but I can mark this ticket with a feature request tag. These tags help give a resource to our Product team to gauge customer interest in various features or improvements. While there is no way to use features within the program itself to properly address the scenario in which you unfortunately find yourself, as an avenue for adjustments to how the software currently operates in regards to the attachment or detachment of network drives, it’s an entirely valid request for changes in the future.
Nathaniel, Technical Support Agent, Code42
That’s very nice of you, Nathaniel! Thank you very much!
I have a NAS, a QNAP TS-419P II. It’s about a decade old and it has always served me well. Due to various reasons I have never used it in an efficient way, it was always like a huge external drive, not really integrated in the rest of my filesystems.
The NAS has a couple of CIFS shares with very obvious names:
backup
Download
Multimedia, with directories Music, Photos and Videos
(There are a few more shares, but they aren’t relevant now.)
In Ubuntu, a user home directory has these default directories:
Downloads
Music
Pictures
Videos
I want to store the files in these directories on my NAS.
Mounting shares, the obvious way
First I moved all existing files from ~/Downloads, ~/Music, ~/Pictures, ~/Videos to the corresponding directories on the NAS, to get empty directories. Then I made a few changes to the directories:
CIFS shares don’t have a concept of user per file, so the entire share is shown as owned by the same user. uid=1000 and gid=1000 are the user ID and group ID of the user amedee, so that all files appear to be owned by me when I do ls -l.
The credentials option points to the file with the username and password.
The default character encoding for mounts is iso8859-1, for legacy reasons. I may have files with funky characters, so iocharset=utf8 takes care of that.
Then I did sudo mount -a and yay, the files on the NAS appear as if they were on the local hard disk!
Fixing a slow startup
This all worked very well, until I did a reboot. It took a really, really long time to get to the login screen. I did lots of troubleshooting, which was really boring, so I’ll skip to the conclusion: the network mounts were slowing things down, and if I manually mount them after login, then there’s no problem.
It turns out that systemd provides a way to automount filesystems on demand. So they are only mounted when the operating system tries to access them. That sounds exactly like what I need.
To achieve this, I only needed to add noauto,x-systemd.automount to the mount options. I also added x-systemd.device-timeout=10, which means that systemd waits for 10 seconds, and then gives up if it’s unable to mount the share.
From now on I’ll never not use noauto,x-systemd.automount for network shares!
While researching this, I found some documentation that claims you don’t need noauto if you have x-systemd.automount in your mount options. Yours truly has tried it with and without noauto, and I can confirm, from first hand experience, that you definitely need noauto. Without it, there is still the long waiting time at login.
It wasn’t long until my bug got confirmed. Someone else chimed in that they had also experienced USB issues. In their case it were external drive devices. Definitely a showstopper!
As of this date, there is a beta for Ubuntu 22.04, and my hope is that this version will either include a new enough kernel (5.16 or up), or that Ubuntu developers have manually cherry-picked the commit that fixes the issue. Let’s check with the Ubuntu Kernel Team:
Ubuntu Kernel Team
Oops… based on upstream 5.15… that’s not good. Maybe they cherry-picked upstream commits? I checked https://packages.ubuntu.com/jammy/linux-generic and the kernel is currently at 5.15.0.25.27. The changelog doesn’t mention anything about xhci or usb. I guess I still have to wait a bit longer…
In previous blogposts I wrote about how I found a possible bug in the Linux kernel, or more precisely, in the kernel that Ubuntu derived from the mainline kernel.
Versions 5.xx.yy-zz-generic are installed with apt.
Versions 5.xx.yy-05xxyy-generic are installed with the Ubuntu Mainline Kernel Installer.
Versions 5.xx.yy-ubuntu-5.13.0-zz.zz-nnn-g<commithash> are compiled from source, where <commithash> is the commit of the kernel repository that I compiled.
The kernels in bold are the kernels where something unexpected happens with my USB devices:
Ubuntu kernels 5.13.23 and up – including 5.15 kernels of Ubuntu 22.04 LTS (Jammy Jellyfish).
Ubuntu compiled kernels, starting 387 commits after kernel 5.13.22.
Mainline kernels 5.15.xx.
When Ubuntu finally bases their kernel on mainline 5.16 or higher, then the USB bug will be solved.
… but you don’t need--- at the start of a YAML file in Ansible.
What does the Ansible documentation say?
I know, I know, if you look at the official documentation on docs.ansible.com, then all of the examples start with ---. And if the official examples do it, then everyone should just blindly copy that without thinking, right?
Wrong! The Ansible documentation on YAML syntax says:
There’s another small quirk to YAML. All YAML files (regardless of their association with Ansible or not) can optionally begin with --- and end with .... This is part of the YAML format and indicates the start and end of a document.
I’ve added the emphasis: optionally. They then continue with one example with --- at the start and ... at the end. The funny thing is, that’s about the only example on the Ansible documentation site (that I could find) that ends with .... So the end marker ... is clearly optional. What about the start marker ---?
What does the YAML specification say?
Ansible uses version 1.2 of the YAML specification and unless you are doing something really exotic, that’s the only version you should care about. Revision 1.2.0 was published in July 2009 and revision 1.2.2 in October 2021. That last revision doesn’t make any changes to the specification, it only corrects some errors and adds clarity.
A stream can contain zero or more documents. It’s called a (character) stream because it can be something else than a file on your hard disk, for example some data that’s sent over a network connection. So your Ansible playbook file with extension .yml or .yaml is not a YAML document, it’s a YAML stream.
A document can have several parts:
Document prefix: optional character encoding and optional comment lines. Seriously, it’s 2022, are you going to make life hard for yourself and use any other encoding than ASCII or UTF-8? The default encoding that every YAML processor, inclusing Ansible, must support is UTF-8. So You Ain’t Gonna Need It. Comments can be placed anywhere, so don’t worry.
Document directives: these are instructions to the YAML processor and aren’t part of the data structure. The only directive I’ve occasionally seen in the wild is %YAML 1.2, to indicate the version of YAML used. That’s the default version for Ansible anyway, so You Ain’t Gonna Need It.
Document markers: a parser needs some way to know where directives stop and document content begins. That’s the directives end marker, ---. There is also a document end marker, ..., which tells a parser to stop looking for content and start scanning for directives again. If there are no markers and the first line doesn’t start with % (a directive), then a parser knows that everything is content. In real life you probably won’t ever have multiple documents in the same stream (file), instead you’ll organize your Ansible code in separate .yaml files, with playbooks and roles and tasks etc.
Document content: that’s the only really interesting stuff you care about.
YAML knows 3 types of documents:
Bare documents: don’t begin with directives or marker lines. Such documents are very “clean” as they contain nothing other than the content. This is the kind of YAML documents I prefer for Ansible.
Explicit documents: begin with an explicit directives end maker (---) but have no directives. This is the style that many people use if they just copy/paste examples from Stack Overflow.
Directives documents: start with some directives, followed by an explicit directives end marker. You don’t need directives for Ansible.
Configuring yamllint
I use ansible-lint and yamllint in a pre-commit hook to check the syntax of my Ansible files. This is currently my .yamllint.yml:
document-start makes sure that there is no --- at the start of a file. I also have opinions on truthy: an Ansible playbook is supposed to be readable both by machines and humans, and then it makes sense to allow the more human-readable values yes and no.
Do you also have opinions that make you change the default configuration of your linters?
Ubuntu mainline kernel packages 5.15.7 and later bump a dependency from libssl1.1 (>= 1.1.0) to libssl3 (>= 3.0.0~~alpha1).
However, package libssl3 is not available for Ubuntu 21.10 Impish Indri. It’s only available for Ubuntu 22.04 Jammy Jellyfish (which is still in beta as of time of writing) and later.
libssl3 further depends on libc6>=2.34 and debconf, but they are available in 21.10 repositories.
Here are a few different ways to resolve the dependency:
Option 1
Use apt pinning to install libssl3 from a Jammy repo, without pulling in everything else from Jammy.
This is more complicated, but it allows the libssl3 package to receive updates automatically. Do all the following as root.
Create an apt config file to specify your system’s current release as the default release for installing packages, instead of simply the highest version number found. We are about to add a Jammy repo to apt, which will contain a lot of packages with higher version numbers, and we want apt to ignore them all.
$ echo 'APT::Default-Release "impish";' \
    | sudo tee /etc/apt/apt.conf.d/01ubuntu
Add the Jammy repository to the apt sources. If your system isn’t “impish”, change that below.
$ awk '($1$3$4=="debimpishmain"){$3="jammy" ;print}' /etc/apt/sources.list \
    | sudo tee /etc/apt/sources.list.d/jammy.list
Pin libssl3 to the jammy version in apt preferences. This overrides the Default-Release above, just for the libssl3 package.
This only works if there aren’t any additional dependencies, which you would also have to install, with a risk of breaking your system. Here Be Dragons…
Recently I wanted to print some PDF files containing sheet music. The tedious way to do that, would be to open them one by one in Evince and press the print button. Surely there must be a more efficient way to do that?
There are 2 console commands for printing: lp and lpr. One comes from grandpa System V, the other from grandpa BSD, and both are included in CUPS. The nice thing about these commands is that they know how to interpret PostScript and PDF files. So this is going to be easy: just cd into the directory with the PDF files and print them all:
$ lp *.pdf
lp: Error - No default destination.
Oops. A quick Google search of this error message tells me that I don’t have a default printer.
printer HP_OfficeJet_Pro_9010_NETWORK is idle.  enabled since za 12 mrt 2022 00:00:28
printer HP_OfficeJet_Pro_9010_USB is idle.  enabled since za 12 mrt 2022 00:00:17
no system default destination
I have a HP OfficeJet Pro 9012e printer, which Ubuntu recognizes as a 9010 series. Close enough. It’s connected over network and USB. I’m setting the network connection as default with lpoptions:
I can then use lpq to verify that the default printer is ready:
$ lpq
HP_OfficeJet_Pro_9010_NETWORK is ready
no entries
Printing multiple files from console
I found that if I naively do lp *.pdf, then only the last file will be printed. That’s unexpected, and I can’t be bothered to find out why. So I just use ls and feed that to a while-loop. It’s quick and dirty, and using find+xargs would probably be better if there are “special” characters, but that’s not the case here.
There’s one caveat: when the PDF files are printed one by one, then the first page will be at the bottom of the paper stack, so I need to print them in reverse order.
$ ls --reverse *.pdf | while read f; do lp "$f"; done
With that command I got 17 print jobs in the printer queue, one for each file.
Now that I know how to print from console, I’ll probably do that more often. The man page of lp describes many useful printing options, like printing double sided:
Now that I have a way to compile kernels from source, I want to find the exact commit where my input devices stop working. That means doing a git checkout of a certain commit, build the kernel, install it, reboot, select the new kernel in Grub, and see if my keyboard works. I am quite sure that I need to search between 5.13.0-22 and 5.13.0-23, but that’s still 634 commits!
This is where git bisect comes in. It’s sort of a wizard that guides you to find a bad commit. You tell it on which commit your software was known to work ok, and a commit where it doesn’t. It then picks a commit somewhere in the middle, you build your software and do your tests, and then tell git bisect if the result was good or bad. It will then give you a new commit to inspect, each time narrowing the search.
git bisect
Let’s do this!
$ git bisect start
$ git bisect good Ubuntu-5.13.0-22.22
$ git bisect bad Ubuntu-5.13.0-23.23
Bisecting: 316 revisions left to test after this (roughly 8 steps)
[398351230dab42d654036847a49a5839705abdcb] powerpc/bpf ppc32: Fix BPF_SUB when imm == 0x80000000
$ git describe --long
Ubuntu-5.13.0-22.22-317-g398351230dab
In this first step, I get the 317th commit after 5.13.0-22. Let’s compile that commit:
$ time make clean olddefconfig bindeb-pkg \
    --jobs=$(getconf _NPROCESSORS_ONLN) \
    LOCALVERSION=-$(git describe --long | tr '[:upper:]' '[:lower:]')
This creates 3 .deb packages in the directory above:
Now I can reboot, select the new kernel in Grub, and test the keyboard. With commit 317, the keyboard worked, so the first bad commit has to be somewhere between commit 317 and 634:
$ git bisect good ; git describe --long
Bisecting: 158 revisions left to test after this (roughly 7 steps)
[79b62d0bba892e8367cb46ca09b623c885852c29] drm/msm/a4xx: fix error handling in a4xx_gpu_init()
Ubuntu-5.13.0-22.22-475-g79b62d0bba89
Now it’s time again for make clean olddefconfig bindeb-pkg, dpkg --install and reboot. Turns out that commit 475 was a “bad” commit (one where the keyboard didn’t work):
$ git bisect bad ; git describe --long
Bisecting: 78 revisions left to test after this (roughly 6 steps)
[c3d35f3acc3a11b726959c7b2c25ab9e46310273] USB: serial: option: add Telit LE910Cx composition 0x1204
Ubuntu-5.13.0-22.22-396-gc3d35f3acc3a
I’m not going to describe all the steps in full detail, by now you should get the gist of it. This was the sequence of steps that git bisect gave me:
$ git bisect bad ; git describe --long
0fc979747dece96c189bc29ef604e61afbddfa2a is the first bad commit
commit 0fc979747dece96c189bc29ef604e61afbddfa2a
Author: Pavankumar Kondeti <pkondeti@codeaurora.org>
Date:   Fri Oct 8 12:25:46 2021 +0300

    xhci: Fix command ring pointer corruption while aborting a command

    BugLink: https://bugs.launchpad.net/bugs/1951880

    commit ff0e50d3564f33b7f4b35cadeabd951d66cfc570 upstream.

    The command ring pointer is located at [6:63] bits of the command
    ring control register (CRCR). All the control bits like command stop,
    abort are located at [0:3] bits. While aborting a command, we read the
    CRCR and set the abort bit and write to the CRCR. The read will always
    give command ring pointer as all zeros. So we essentially write only
    the control bits. Since we split the 64 bit write into two 32 bit writes,
    there is a possibility of xHC command ring stopped before the upper
    dword (all zeros) is written. If that happens, xHC updates the upper
    dword of its internal command ring pointer with all zeros. Next time,
    when the command ring is restarted, we see xHC memory access failures.
    Fix this issue by only writing to the lower dword of CRCR where all
    control bits are located.

    Cc: stable@vger.kernel.org
    Signed-off-by: Pavankumar Kondeti <pkondeti@codeaurora.org>
    Signed-off-by: Mathias Nyman <mathias.nyman@linux.intel.com>
    Link: https://lore.kernel.org/r/20211008092547.3996295-5-mathias.nyman@linux.intel.com
    Signed-off-by: Greg Kroah-Hartman <gregkh@linuxfoundation.org>
    Signed-off-by: Kamal Mostafa <kamal@canonical.com>
    Signed-off-by: Stefan Bader <stefan.bader@canonical.com>

 drivers/usb/host/xhci-ring.c | 14 ++++++++++----
 1 file changed, 10 insertions(+), 4 deletions(-)
Ubuntu-5.13.0-22.22-387-g0fc979747dec
At first sight the commit description is quite cryptic, and the actual code change doesn’t tell me a lot either. But it’s a change in drivers/usb/host/xhci-ring.c, and xhci stands for eXtensible Host Controller Interface, and interface specification for USB host controllers. If it’s an issue with the USB host controller, then it makes sense that if I use 2 keyboards from different brands, neither of them would work. It also suggests that other USB devices, like external hard drives, wouldn’t work either, but that’s a bit harder to test. A keyboard is easy. Just look at NumLock LED, if it doesn’t go on then there’s an issue.
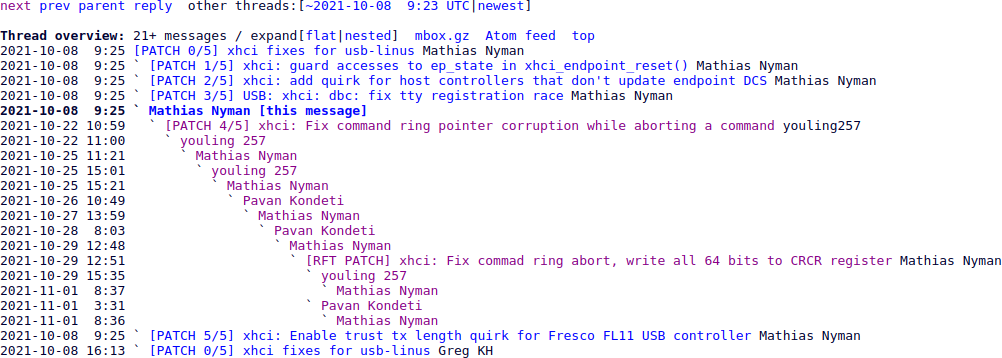
The first link in the commit description is just a long list of patches that were taken from upstream and integrated in the Ubuntu kernel, so that doesn’t help me. The second link is a thread on the kernel.org mailing list, and there it gets interesting.
kernel.org mailing list thread
Some excerpts from the thread:
This patch cause suspend to disk resume usb not work, xhci_hcd 0000:00:14.0: Abort failed to stop command ring: -110.
youling257
Thanks for the report, this is odd. Could you double check that by reverting this patch resume start working again. If this is the case maybe we need to write all 64bits before this xHC hardware reacts to CRCR register changes. Maybe following changes on top of current patch could help:
Mathias Nyman
Every time a developer says “this is odd”, my alarm bells go off. 😀
Further down in the thread there is a proposed update to the change. I’m going to try that patch, but that’s for another blog post.